This is an old revision of the document!
Setting up system 7.5.3 with BasiliskII for Mac OSX
(Last updated June 17, 2013)
(you can also set up Basilisk II for Windows)
Introduction
Basilisk II emulates up to a 68040 Macintosh, which can run Mac OS 7.x through 8.1.
This manual can be used with 04-10-2009 or later builds of BasiliskII.
Please note:
- This manual describes setting up BasiliskII with MacOS 7.5.3 (free to download from Apple), inside a folder called BasiliskII in your Home folder.
- Changed settings in preferences will take effect after BasiliskII has been started from the BasiliskIIGUI. With only a restart in the emulated machine new settings will not be used.
- Using most compatible ROM files it is also possible to run up to MacOS 8.1 in Basilisk II.
- Not covered here, but when installing MacOS from a CD, only generic retail Mac OS install CDs can be used. A system install CD that was originally provided with a new Mac will only install on that specific model.
- Not covered here, but a disk image of a retail Mac OS install CD can be used instead of the real CD. The disk image must be in a non-compressed format and the image file must be locked in the Finder to convince the installer that it is on the original read-only CD.
Preparing Your BasiliskII Folder
To start, you need to have some files in your BasiliskII folder:
- The BasiliskII application, the actual emulator.
- The BasiliskIIGUI application, to be used for setting up and configuring BasiliskII.
- A floppy disk image to boot the Mac. Download it here. Unzip the file, and lock it. Select “Get Info” and check the “Locked” box. Use only this floppy image. System 7/7.5 floppy images will make you run into problems later during the installation process, because they don't allow the shared folder to appear on the desktop, see below.
- A compatible ROM file. Basilisk II will not run without a compatible ROM file. If BasiliskII does not find a compatible ROM file, it will immediately quit on launch. It may be difficult to get ahold of a compatible ROM file as distributing bare ROM files violates Apple license agreements. ROM files from Quadra and Performa machines work best. Google “redundant robot sheepshaver” for downloads.
- A keycodes file. The keycodes file is not necessary if you are using a US English QWERTY keyboard layout.
- A folder shared between OSX and BasiliskII. From within BasiliskII you will have access to a folder on the Mac OS X side. That folder will appear on the BasiliskII desktop as a disk named “Unix”. Files copied or saved in BasiliskII to the “Unix” disk will appear in the shared folder on the Mac OS X side and files placed in the shared folder on the Mac OS X side will appear in the “Unix” disk in BasiliskII. Before you start configuring BasiliskII, create a folder that can serve as shared folder. The folder can be anywhere it is convenient for you and it can have any name you like. However, this manual assumes that a shared folder in the BasiliskII folder called “Shared” is available. Prepare for installation of MacOS by creating the Shared folder in your BasiliskII folder. Then download the 19 installer parts for System 7.5.3 from Apple and place them in the folder.
Take a look at the file names. If the first is named with a ”.smi” extension and the others with a ”.part” extension, you can skip the next step of double-clicking all files individually. Double-clicking the files will unpack them, leaving you with the double amount of files in the folder. When finished, remove the files not named with the “.smi” or “.part” extensions.
Running BasiliskIIGUI
When the files needed are in the Basilisk II folder and when you have created a shared folder, you can start configuring Basilisk II:
1. Start BasiliskIIGUI
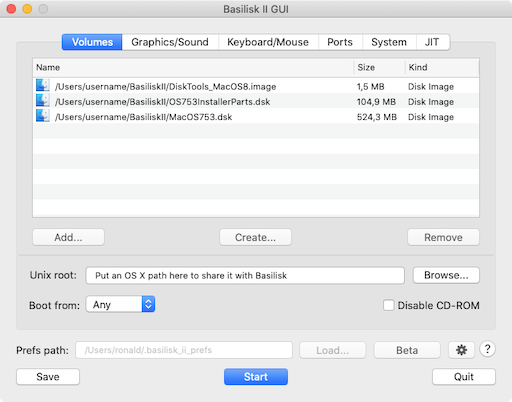
2. Configure preferences in Volumes tab
BasiliskII will always try to start from the first entry in this list. As we will start from a floppy disk, you’ll need to add the floppy disk image you downloaded to the list of Volumes (floppy or hard disk image files BasiliskII can use as disks).
-Click “Add” and select the floppy disk image in your BasiliskII folder. Note that the navigation might be a bit awkward for OSX users. (Following our example, in the left browser pane, browse to “Users”, “your user name”, “BasiliskII” and select the floppy disk image in the right browser pane)
-Click OK
The floppy will show up in the volumes list.
Next, we’ll create a file that will be used as your Mac hard disk to install your future Mac OS on.
-Click “Create”
-Navigate to the folder you want to create the file in.
-Set the size for the hard disk. I would recommend 500 or 1000 Mb
-Give the file a name under “Selection”, name it “MacOS753”
-Click OK
(This can take some time, be patient)
After the file is created, the window will close and you’ll see the preferences editor again. Notice the hard disk is also added to the list of volumes. For the installer parts to be available later on, we need to create another hard disk.
-Click “Create” to make a hard disk with size of 100Mb and name it “InstallerParts”.
In order to have the shared folder available to exchange files between OSX and Mac OS, we need to set the location of that folder at “Unix Root”.
-Type the path to the shared folder in the field after “Unix Root”. The line below shows what to enter when the folder is called Shared and is located in the BasiliskII folder in your Home folder.
/Users/”hsp”/BasiliskII/Shared (replace my username with yours, and don’t use quotes!)
Now click the tab Graphics/Sound on the Preferences editor
3. Configure preferences in Graphics/Sound tab
-For now, leave the Video Type selection at “Window” (After installation you might select “Full Screen”).
-Select the desired screen refresh rate. On a fast, current machine, select “Dynamic”. On a PowerPC machine, select e.g. 30Hz. (Higher rates slow the emulator down, 30Hz may improve performance and will lower the extreme CPU hunger of BasiliskII on PowerPC machines.)
-Select the desired width and height of the emulator window.
Set Width and Height for the window to lower values than the resolution of your actual screen. If you have a large screen, you can manually enter higher values than those in the menus, for instance 1280 x 800.
The Audio Settings can be ignored.
Move to the keyboard/Mouse tab
4. Configure preferences in Keyboard/Mouse tab
-Check “Use Raw Keycodes” and browse for the keycodes file in the BasiliskII folder if your keyboard lay-out is not US-English.
“Mouse Wheel Function” and “Lines to Scroll” are a matter of taste. The image shows the standard settings.
Move to the Serial/Network tab
5. Configure preferences in Serial/Network tab
In order to be able to use the internet in Basilisk, you need to set the Ethernet Interface to “slirp.“
-Open the list box, select “slirp”
Ignore the “Modem Port Device” and “Printer Port Device” settings.
Now move to the memory/misc tab
6. Configure preferences in Memory/Misc tab
Several important choices are to be made here.
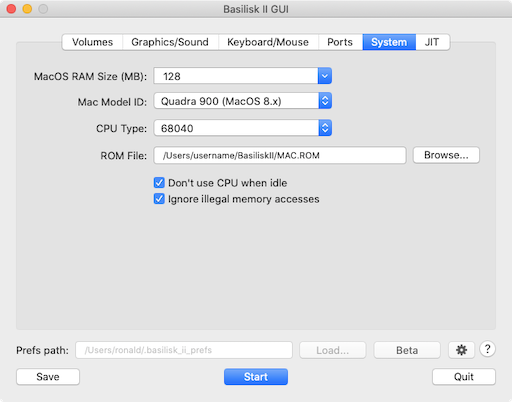
-Set the amount of memory available to Mac OS in Basilisk.
-Set Mac Model ID to “Quadra 900” and CPU type to “68040”
-Select the rom file to be used. Click “Browse” and navigate to your rom file. Select it and click OK.
Also set:
-“Don’t use CPU when idle” and “Ignore Illegal Memory Accesses” (this allows some badly written programs to run)
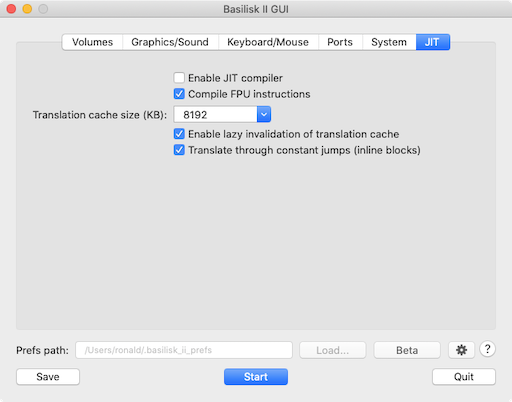
Next, click the JIT Compiler tab.
7. Configure preferences in JIT Compiler tab
Please set the preferences as shown in the image below:
8. Click start!
-Click “Start” to save the settings and to start BasiliskII.
Inside Mac OS
During startup, the system will encounter the floppy and give a warning about running of a floppy disk.
-Click “OK” to proceed.
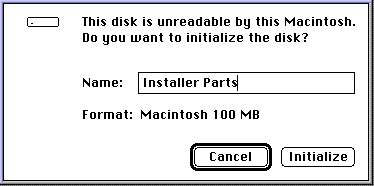
The system will now find the hard disks we created earlier (saying this is not a mac disk) and will offer to initialize them.
-Give the first disk an appropriate name (for instance MacOS753) and choose Mac OS Standard as format.

-Click “Initialize” to proceed with initializing the hard disk.

-Name the second hard disk “Installer Parts”. Again, click “Initialize” to proceed with initializing the hard disk.
Finally, you will see the desktop with icons for:
-the startup volume (the disk tools floppy disk),
-the icon for the new hard disk that you will install the system onto (MacOS753),
-the icon of the disk that will hold your installer parts (Installer Parts) and
-the icon for the “Unix” volume that gives access to the shared folder on the Mac OS X side.
-Open the “Unix” hard disk and copy all 19 files onto the “Installer Parts” disk

-Copy all 19 files to the Installer Parts disk
-On the “Installer Parts” disk, start the installation of Mac OS 7.5 by double-clicking the first part called “System 7.5.3 01of19.smi”. A CD image icon will appear on your desktop.
![]()
-Double-click it and start the installer contained in the folder that opens.
Proceed with the system installation and when the installation is completed, you can quit the installer.
-Quit Mac OS.
Sometimes the BasiliskIIGUI needs a little kick, so if it is still running, Force Quit it.
Finishing
-Start the BasiliskIIGUI again.
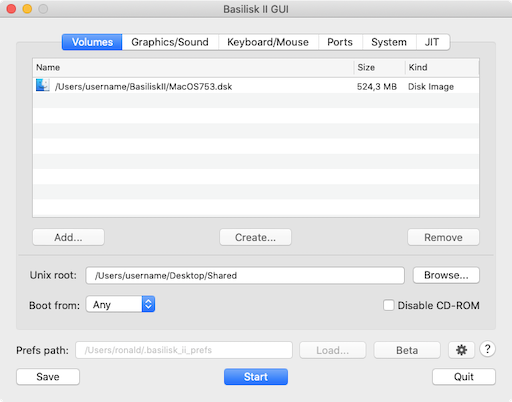
-On the volumes tab remove the “DiskTools_MacOS89.image” and “installerparts” disks.
-On the memory/misc tab set the mac model id to support system 7.x
-Click Start.
Support
Direct questions to our support forum. Note that this guide is partially derived from our SheepShaver for OS X setup guide.

